Rename interfaces on Linux

I just reinstalled a Debian stable on a laptop but messed with the interfaces so that an external USB WiFi card appeared as wlan0 while the main card appeared as wlan1. In case you wondered you can rename or reset interface names in /etc/udev/rules.d/70-persistent-net.rules. That’s on systemd though.
I wonder how we can change that on sysvinit? Nobody cares, probably, but I do.

According to what I read there, it is not consistent. Interfaces are named in the order in which they appear during the boot process. However it is possible to use ifrename from the wireless tools package. Why this tool that should work for all type of interface is part of the wireless tools package is beyond my comprehension. But hey whatever, Linux, and it just works.

If you are curious and want to know how ifrename actually does rename an interface, according to the code it uses a SIOCSIFNAME ioctl on a socket file descriptor. There it passes a struct ifreq in which you can provide a new name for the interface. Just man netdevice(7) for more info.

Use notify-send as root

The automount script is a neat devd based automounter for FreeBSD. Just pkg install automount and all your removable media will mount themselves automatically in /media when you plug them in. It’s very clean. You may also check vumount, a short script that I made to list all removable media and remove the mount point when you unmount them.

It’s possible to configure automount to send a notification to your desktop using notify-send from libnotify. What it does exactly is (as root):

env DISPLAY=:0 notify-send automount "Device '${1}' mounted on '${3}' directory."

Except that it doesn’t work… I started dbus-monitor and tried notify-send as root (from ttyv2) but didn’t receive anything and notify-send did not complain. So I tried to start dbus-monitor from root instead, in the hope that it would be a bit more verbose than notify-send. I got this error message:

Failed to open connection to session message bus: Did not receive a reply. Possible causes include: the remote application did not send a reply, the message bus security policy blocked the reply, the reply timeout expired, or the network connection was broken.

By default DBus sessions are private and don’t accept connections from other users than the one that own the bus, even root. The solution is to configure DBus to allow root on the session bus. Edit /usr/local/etc/dbus-1/session.conf and add this line to the default policy:

<allow user="root"/>

But you still need tell DBus how to connect to the session bus. To do so you have to specify the session bus address in DBUS_SESSION_BUS_ADDRESS. Fortunately automount is a shell script, so you can fetch and export the bus address from its configuration file. Just add this to /usr/local/etc/automount.conf:

# Load DBus session bus address
DBUS_USER=your-user
if [ -d /home/$DBUS_USER/.dbus/session-bus ]
then
  dbus_file=$(ls -t1 /home/$DBUS_USER/.dbus/session-bus | head -n1)
  export DBUS_SESSION_BUS_ADDRESS=$(cat /home/$DBUS_USER/.dbus/session-bus/$dbus_file | \
                                    grep "DBUS_SESSION_BUS_ADDRESS=" | \
                                    sed 's/[A-Z_]*=//')
fi

Data signing failed

I got the following error while trying to send a signed (GPG) e-mail using claws-mail:

Signature failed: Data signing failed, General error

Turns out it was a path problem. The GPG agent uses pinentry to ask for your private key password. The agent was configured with the absolute path to pinentry-gtk-2 on Linux. But this happened on FreeBSD and executables are located in /usr/local, not /usr.

So I changed in ~/.gnupg/gpg-agent.conf:

- pinentry-program /usr/bin/pinentry-gtk-2
+ pinentry-program /usr/local/bin/pinentry-gtk-2

No more corruption on the RPi

I talked in a preceding post about corruption problems on my RPi’s SD-Card. I was told that 4.65V is very low for the RPi and that was probably the cause for the frequent corruptions of the SD-Card. Unfortunately new peripherals drop the voltage rather quickly on the RPi. Here are the voltage after each plugin in (cumulative):

  • None: 4.80V
  • Ethernet (internal – smsc95xx)4.77V
  • Ethernet (external – asix): 4.66V

So my first solution was to limit the stress on the SD-Card. I measured the IO bandwidth of various task with iotop -aoP. Turns out that most tasks accounted for only a handful to a hundred of kylobytes. These tasks are sporadic (dhcpd, rsyslogd and jbd for the most part) and in the end of the day accounted for less than 20MB read/write on the SD-Card.

On the other end an update (apt-get) account for around 80MB of writes. That’s a lot combined to increased CPU usage that further contributed to the voltage drop. With apticron running an update at least once a day, it’s not a wonder that the SD-Card got corrupted so quickly.

So my first solution was to put apt into a tmpfs. That is in /etc/fstab:

tmpfs /var/lib/apt   tmpfs noatime,nosuid,nodev,noexec,mode=755 0 0
tmpfs /var/cache/apt tmpfs noatime,nosuid,nodev,noexec,mode=755 0 0

And we don’t want packages to fill the cache. So we specify that the cache should be emptied after each package installation / upgrade. That is in /etc/apt/apt.conf.d/70no-cache:

DPkg::Post-Invoke { "/bin/rm -f /var/cache/apt/archives/*.deb || true"; };

This way an apt-get update does not solicit the SD-Card anymore. On the plus point updates are also faster. However there are two disadvantages with this solution:

  • You cannot upgrade after the system just rebooted. You need to rebuild the cache with apt-get update first. But that is not a problem as apticron does so automatically once a day.
  • The number of packages you can install / upgrade at once depends on their size and the size of the tmpfs. But it is OK if you frequently upgrade your system on stable.

But that is probably not enough to avoid corruption on the SD-Card. Or at least this is what I thought. So the other solution was to find a way to raise the voltage from 4.66V to a reasonable value. The F3 polyfuse that protects the board has a noticeable resistance causing a voltage drop of ~0.2V.
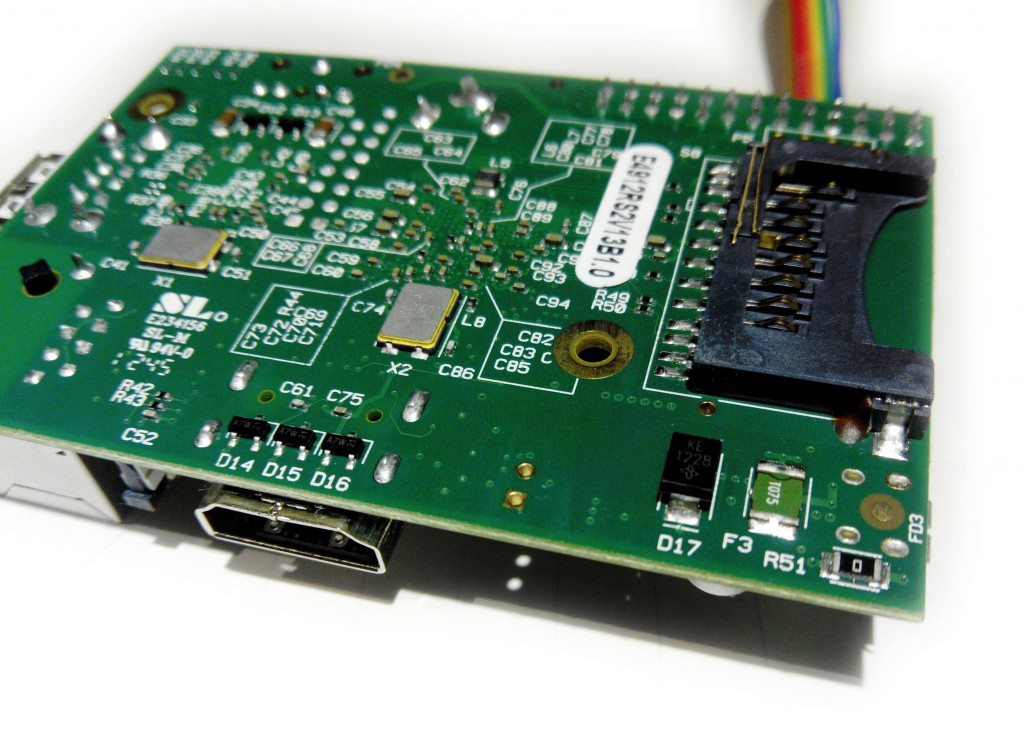
The F3 polyfuse (green) is located at the bottom right of the board, next to the zero ohm resistor.

The F3 polyfuse (green) is located at the back bottom right of the board.

I soldered the polyfuse and the voltage raised to 4.85V. Did not have any corruption problem since more than a month. Fantastic!

However remember that the fuse is there for a reason. It limits the maximum amount of current powering the board. Without the polyfuse the RPi can ask more current than the PSU is rated for (which can happen for example if you short the GPIOs). So it might be a better idea to try another power supply or USB cable. I just like to live dangerously. I also protected those RPi with a case. Note that the RPi B+ and newer have a new power supply circuitry with a lower voltage drop. So all of this may not be needed.

Constant SD-Card corruption on the RPi

Our home servers broke. Here we are again.

I spent weeks of my time, countless evenings up to 4AM, entire weekends since months trying to design and configure our reborn home-servers and gateways.

And it was neat.

  • DNSSEC all the way down
  • RPC accross the nodes
  • Easy configuration
  • Caching and stuff
  • Automatic tests

It took me a lot of time to assemble all of this in something that I liked. And to document everything so that we could easily install a new node from scratch.

I installed two nodes and it worked well for several weeks. Until a week ago or so I started to see corruption on the first node. And by corruption I mean random garbage in a lot of binaries and libraries. Exec format error at every corner. At this point it was completely broken and useless so the only option was to reinstall it.

So I used a new SD-Card, changed the power supply and reinstalled everything last weekend. Just finished today and also fixed bugs in some of our scripts. Had to search for a package on the second node which at this point was still in a pretty good shape.

$ apt-cache
zsh: exec format error: apt-cache
$ su
zsh: exec format error: su

Dang! So there goes another weekend I will spend to reinstall the thing. And who knows how long until the first node gets corrupted again.

Checked the TP1-TP2 voltage, 4.65V, probably because of the second USB Ethernet adapter. I tried to limit the amount of writes on the SD-Card. No heavy writers, no swapping, no overclocking.

So I must be doing something wrong, right? Right?! The RaspberryPi can be that unreliable. I wonder how many power supplies and SD-Cards I will have to buy and try until, by sheer luck, I do not have to reinstall everything in the following three months or so.

I ran into this problem years ago. And now it seems that I will run in the same problem over and over again. Any recommendation is welcome of course. Though to be honest, for now, I just want to fly the damn thing across the room.

Switch MTA on FreeBSD

As you probably know FreeBSD comes with Sendmail installed as the default MTA. However this may be a bit overkill on a desktop installation where the most you might want is to relay mails to an external address. Luckily it is quite easy to change the default MTA as described in the handbook, see 28.4. Changing the Mail Transfer Agent.

On my Desktop I prefer to install nullmailer. This is a simple MTA replacement for hosts which only relay mails through a smart relay. GNUTLS (SSL) is not enabled by default in the nullmailer package on FreeBSD. So if you want SSL you have to compile the port. This is my case. Let’s install it:

cd /usr/ports/mail/nullmailer
make install clean
(...)
pkg lock nullmailer

The configuration happens in /usr/local/etc/nullmailer. This directory contains multiple files and each one of them focuses on a specific aspect of the configuration.

First we specify the remote SMTP through which our mail shall be relayed, this is the remotes file. This file contains a list of remote servers, the module used to send the message and command-line arguments for that module. Modules are located in /usr/local/libexec/nullmailer. The man page states that you can list available options using --help on each protocol module.

In most cases you want to use the smtp module which takes the following arguments (with SSL enabled):

  • port: SMTP port (25, 465, 587, …)
  • user: SMTP user
  • pass: SMTP password
  • auth-login: LOGIN authentication method (default to PLAIN)
  • ssl: Use SSL/TLS encryption
  • starttls: Use STARTTLS command to initiate encrypted connection
  • insecure: Accept invalid certificates (which I do not recommend)
  • x509certfile: Client certificate file
  • x509cafile: Certificate Authority trust file (default to /etc/ssl/cert.pem on FreeBSD)
  • x509crlfile: Certificate revocation list
  • x509fmtder: Switch from PEM to DER format for the certificates

Here is an example that would relay through relay.example.com:465 using SSL and LOGIN authentication:

relay.example.com smtp --port=465 --ssl --auth-login --user=some-user --pass=some-password

Since this file contains your SMTP password in cleartext, I advise you to:

chown nullmail:nullmail remotes
chmod 600 remotes

Next we edit the name that will be used to construct email addresses on this host. You configure this in the me file. Normally this should be the fully-qualified host name of the computer running nullmailer. This is really useful to distinguish, say root at machine-a from root at machine-b. However some mail providers refuse to relay mails from a different domain name than their own so it might be useful to change this in those cases (I am my own mail provider, so personally I don’t care and do what I want). You also need to configure defaultdomain to your domain name. That is your FQHN minus the hostname. If a mail is sent to an address that is not localhost and does not contain a domain name (no period in the hostname), this domainname will be appended to it.

After that we configure the mail to which all local mails are forwarded. You configure this address in the adminaddr file. And we also configure the file pausetime. This is the interval of time between two queue runs with a default value of 60 seconds. I prefer to set this to a higher value, like 15 minutes.

For more information about the configuration of nullmailer, see this article. Although related to Raspbian on a RPi, it remains mostly the same.

Now we need to replace the MTA on FreeBSD. First we configure the mailwrapper (see man mailwrapper) in /etc/mail/mailer.conf. Replace each line with their nullmailer equivalent, that is:

sendmail  /usr/local/libexec/nullmailer/sendmail
send-mail /usr/local/libexec/nullmailer/sendmail
mailq     /usr/local/libexec/nullmailer/mailq

Time to test. Disable sendmail, enable nullmailer and send a mail. Oh and by the way, tail -f /var/log/maillog in any case:

service sendmail stop
service nullmailer onestart
echo Hello from FreeBSD\! | mailx -s "test" root

If it works, you can now disable sendmail and enable nullmailer in /etc/rc.conf:

sendmail_enable="NONE"
nullmailer_enable="YES"

Where did my PGP keys go?

Today I noticed that one of my PGP private key just disappeared of GPG. The key did not appear when I did gpg --list-secret-keys. After a bit of investigation I discovered that the problem did not affect Linux hosts but only FreeBSD hosts. Weird…

The source of the problem was a migration from GnuPG v2.0 to v2.1. According to this page, GPG does not handle the private keys anymore and delegates all private keys operations to the gpg-agent. Therefore GPG v2.1 migrates the legacy secret keyring, secring.gpg, to the gpg-agent key store, private-keys-v1.d and then forgets about it.

Though, you see, my GPG keyrings were synchronized across all hosts. But the GnuPG package on Debian is still v2.0, while FreeBSD is v2.1. Get the picture?

I synced my keyring on FreeBSD hosts where GPG migrated my private keys to the gpg-agent key store. Then I generated a new key pair on a Debian host, which was added to the legacy keyring. Resynced, but the newer version of GPG didn’t care, they already migrated to the new key store.

Fortunately it was easy to fix, all you have to do is re-import your legacy keyring with one of the newer versions of GPG. The private keys are now also present in the new key store so you can sync to all other hosts.

gpg --import $HOME/.gnupg/secring.gpg
gpg --list-secret-keys

WeakDH

Here we go again (The Logjam Attack):

“We have uncovered several weaknesses in how Diffie-Hellman key exchange has been deployed:

  • Logjam Attack against the TLS Protocol. The Logjam attack allows a man-in-the-middle attacker to downgrade vulnerable TLS connections to 512-bit export-grade cryptography. This allows the attacker to read and modify any data passed over the connection. (…)
  • Millions of HTTPS, SSH, and VPN servers all use the same prime numbers for Diffie-Hellman key exchange. Practitioners believed this was safe as long as new key exchange messages were generated for every connection. However, the first step in the number field sieve—the most efficient algorithm for breaking a Diffie-Hellman connection—is dependent only on this prime. After this first step, an attacker can quickly break individual connections. (…) We further estimate that an academic team can break a 768-bit prime and that a nation-state can break a 1024-bit prime. (…) A close reading of published NSA leaks shows that the agency’s attacks on VPNs are consistent with having achieved such a break.”