HiFiBerry on Debian ARM64

Long are gone the days of the ten thousands songs Winamp playlist, the modern way of listening to music consists solely of spotify blasting its (not-so-randomly) set of tracks and ads on random variants of laptop/phones/speakers.

But I will forever say no to that.
Spotify is bad for the artists, for you, our planet and it has as much a good impact on musical culture as Facebook has on our social life. Today, the common physical storage available locally (if you don’t depend uniquely on the cloud) has more than enough room to host all the music you’d ever want to listen to. Of course this means that you have to handle your music playlist manually. But that effort will refine your tastes as to what is genuinely good music to your ears, and what is just effective product placement.

To handle my music media center, I always had a RPi stucked to my HiFi system. This RPi would only handle playing music (mpd) and remote control (Cantata, MPDroid, ). This music would be stored remotely on my NAS and accessible in read-only from NFS (yup NFS not SAMBA/CIFS).

The music is played through a RPi HAT, the HiFiBerry DAC+ based on Texas Instruments PCM5102A DAC chip. This was done on a common Raspbian (the only viable solution back then), may be you could do the same easily on the new RaspberryPi OS. I did try to replicate the same setup on FreeBSD but neither the HiFiBerry nor the PCM5102 codec were supported. Attempts to play the music through a USB audio device instead of the HiFiBerry HAT were ultimately unsuccessful probably because of the USB DWC2 host driver. The same attempt on a FreeBSD running RPi4 with PCIe XHCI USB host ran the same USB audio devices perfectly well.

[Debian Diversity Logo -- https://gitlab.com/valessiobrito/artwork (GPLv3 -- https://gitlab.com/valessiobrito/artwork)]

But since I only had a single RPi4 that was already in use, and the fact that RPi4 are currently way overpriced and out-of-stock, I resolved to try a Linux based setup on a RPi3B. But you see, Raspbian is rather restricted by the fact that the RPi platforms ranges from ARMv6 to ARMv8 SoC. That’s 32 to 64-bit, so as a compromise Raspbian runs everything in 32-bit even on ARM64 capable SoC like the RPi3 or better (the new Raspberry Pi OS has some ARM64 images although it’s not widely advertised). The challenge was that it should run Debian ARM64 and play audio through the HiFiBerry DAC+.

The main problem is that the Debian ARM64 image runs a mainline/vanilla Linux kernel. Among other things this version of the kernel does not have support for the HiFiBerry. Instead I resolved to compile my own kernel with the appropriate driver included. Also to avoid the hurdle of porting everything HiFiBerry related and other RPi/BCM goodies to the mainline kernel, I used the Raspberry Pi Foundation kernel source tree.

As a starting point, I used the configuration of the RPi3B kernel from the Debian ARM64 image, which you can find in /boot/config-5.10.0-8-arm64. Crosscompiling the kernel for ARM64 was pretty straight forward:

# Mount the RPi image
mount /dev/sdf1 /mnt/rpi/fat32
mount /dev/sdf2 /mnt/rpi/ext4

# Install and clone the kernel
apt-get install crossbuild-essential-arm64
git clone git://github.com/raspberrypi/linux.git

# Setup some variable for cross-compiling.
cd linux
export KERNEL=kernel8
export ARCH=arm64
export CROSS_COMPILE=aarch64-linux-gnu-

# Kernel configuration
# (be sure to select the appropriate platform or the Device Tree Blob won't be compiled)
cp /mnt/rpi/ext4/boot/config-5.10.0-8-arm64 .config
make oldconfig
make menuconfig

# Compile!
make Image modules dtbs -j32

# Install
# (you might have to create the 'overlays' directory in the fat32 partition)
VMLINUZ=vmlinuz-5.10.74+
make INSTALL_MOD_PATH=/mnt/rpi/ext4 modules_install
cp arch/arm64/boot/dts/broadcom/*.dtb  /mnt/rpi/fat32
cp arch/arm64/boot/dts/overlays/*.dtb* /mnt/rpi/fat32/overlays/
cp arch/arm64/boot/Image "/mnt/rpi/fat32/${VMLINUZ}"
cp arch/arm64/boot/Image "/mnt/rpi/ext4/boot/${VMLINUZ}"

# Umount the RPi image and boot it still on the old working kernel.
umount /dev/sdf1
umount /dev/sdf2

# Connect to the RPi and create the initrd.
# This should also adapt the boot config. 
update-initramfs -c -k 5.10.74+

If you want to play with Device Tree overlays for example to use a RPi HAT like the HiFiBerry, you will have to compile the dtoverlay manipulation command from the RPi userland repository. Install libfdt-dev, compile and install libdtovl in helpers/dtoverlay, compile dtoverlay in host_applications/linux/apps/dtoverlay.

You need ConfigFS and the following kernel options for the dtoverlay command to work with dynamic DT:

CONFIG_DTC=y
CONFIG_OF=y
CONFIG_OF_UNITTEST=y
CONFIG_OF_DYNAMIC=y
CONFIG_OF_OVERLAY=y
CONFIG_OF_CONFIGFS=y

Also mount ConfigFS:

mkdir /config
mount -t configfs none /config

The command expects to find the overlays in /boot/overlays but on the Debian ARM64 image they will probably be in /boot/firmware/overlays. I fixed this with a symlink.

Next I had to fiddle a bit with the Device Tree sources. If you want some nice documentation about them, here’s a nice pdf from Freescale that explains a lot.

When I first tried to add the HiFiBerry overlay with dtoverlay hifiberry-dacplus, it could not apply because of “incompatible devices”. This was caused by discrepancies between the ARM and ARM64 DT sources for the RPi. This driver was made for the ARM arch than runs Raspbian, not ARM64. And the ARM arch DTS/DTSI exposes devices differently than ARM64. I added the missing devices on ARM64, recompiled and reinstalled the DTB on the RPi image. After that the DT overlay applied like a charm.

The HiFiBerry DAC+ is now happily playing music on Debian ARM64. The RPi3B runs at ~1.14W on idle and ~1.35W when playing music. I don’t how know much the fat-free low-power kernel config contributes to that, but it seems to run at ~1.25W on Debian’s vanilla kernel and I have some ideas to reduce the consumption even further.

FreeBSD on RaspberryPi

RaspberryYou may have heard that ARM64 is now a tier-1 platform on FreeBSD 13. This basically means that this platform is now fully supported by the various FreeBSD teams. Seeing ARM supported as a tier 1 is really cool, since we can now play around with those ARM boards (RaspberryPi, BeagleBone, …) that were so far reserved to a selected set of Linux distributions. Being able to use an entirely different OS is refreshing.

In the last few weeks, I’ve devoted some of the very little free time that I have to try just that. I’ve installed FreeBSD on some RPi3 boards in the hope of replacing whatever they were doing before on Raspbian. If you insist you can use the video, but it’s very slow and totally unusable as a Kodi media-center. The reason being (as far as I understand) that the VideoCore drivers are a pain in the ass to port even from RPi Linux flavor to another, let alone on FreeBSD. So I wouldn’t expect improvement on that front for some time.

However as a network appliance or audio-only media-center, it works nicely. It’s just a matter of downloading the appropriate SD card image for your specific board (here and there), dd it to the SD card, boot with HDMI and USB keyboard, then configure your installation from there. Beware though, you should avoid editing the UFS partition of the image until it has been resized by growfs_enable=YES. In my case that triggered some naughty kernel panics (which I had no time to investigate thoroughly, oops).

I’ve also tried some unsupported platform such as the NanoPi R2S with mitigated success. I managed to boot on the serial interface and install some packages. But USB devices are not (or not always) showing, the driver for the second Ethernet interface is missing, and random kernel panics do happen. So I gave up for now and tried an RPi3 board instead.

I also tried running it on a RaspberryPi 1 B+ v1.2. The reason I’m trying that is to replace my media-center setup, especially the audio part. The RPi1 should consume less power, is perfectly capable for the task at hand and I’ve got a lot of them lying around. Since the device will be always on, it should be a perfect replacement for the RPi3 I used so far. For this I had to use the RPi-B image. Contrary to the RPi3 which runs ARMv8 64-bit, RPi1 B+ is still an ARMv6 32-bit architecture and a tier-2 platform on FreeBSD.

One of the problem with the RaspberryPi is that there are a lot of different version nowadays and they all share similar names. For instance if you say RPi B+, is it RPi3 B+ from 2018, RPi1 B+ from 2014, a confusion with the RPi2 B v1.2 from 2016 or the RPi2 B? All these run on different SoC with different flavor of ARM from ARMv6 to ARMv8. You must pay attention to choose the correct image for your board. Use the Wikipedia’s RaspberryPi page to tell them apart, it’s very complete, especially the Specifications and Connectors sections.

ioctl mem-alloc FAILED

If while trying to play a video on the RaspberryPi, in particular with Kodi, the video doesn’t play and you get this error on the terminal:

[CGPUMEM]: ioctl mem-alloc FAILED [-1]

Then hopefully this post will help you.

You may have read elsewhere that you should increase your GPU memory in /boot/config.txt, then add gpu_mem=256.

But that’s not enough. You also need to increase the limit of the contiguous memory allocator. In /boot/cmdline.txt add the option cma=256M. Then reboot and you should be fine.

No more corruption on the RPi

I talked in a preceding post about corruption problems on my RPi’s SD-Card. I was told that 4.65V is very low for the RPi and that was probably the cause for the frequent corruptions of the SD-Card. Unfortunately new peripherals drop the voltage rather quickly on the RPi. Here are the voltage after each plugin in (cumulative):

  • None: 4.80V
  • Ethernet (internal – smsc95xx)4.77V
  • Ethernet (external – asix): 4.66V

So my first solution was to limit the stress on the SD-Card. I measured the IO bandwidth of various task with iotop -aoP. Turns out that most tasks accounted for only a handful to a hundred of kylobytes. These tasks are sporadic (dhcpd, rsyslogd and jbd for the most part) and in the end of the day accounted for less than 20MB read/write on the SD-Card.

On the other end an update (apt-get) account for around 80MB of writes. That’s a lot combined to increased CPU usage that further contributed to the voltage drop. With apticron running an update at least once a day, it’s not a wonder that the SD-Card got corrupted so quickly.

So my first solution was to put apt into a tmpfs. That is in /etc/fstab:

tmpfs /var/lib/apt   tmpfs noatime,nosuid,nodev,noexec,mode=755 0 0
tmpfs /var/cache/apt tmpfs noatime,nosuid,nodev,noexec,mode=755 0 0

And we don’t want packages to fill the cache. So we specify that the cache should be emptied after each package installation / upgrade. That is in /etc/apt/apt.conf.d/70no-cache:

DPkg::Post-Invoke { "/bin/rm -f /var/cache/apt/archives/*.deb || true"; };

This way an apt-get update does not solicit the SD-Card anymore. On the plus point updates are also faster. However there are two disadvantages with this solution:

  • You cannot upgrade after the system just rebooted. You need to rebuild the cache with apt-get update first. But that is not a problem as apticron does so automatically once a day.
  • The number of packages you can install / upgrade at once depends on their size and the size of the tmpfs. But it is OK if you frequently upgrade your system on stable.

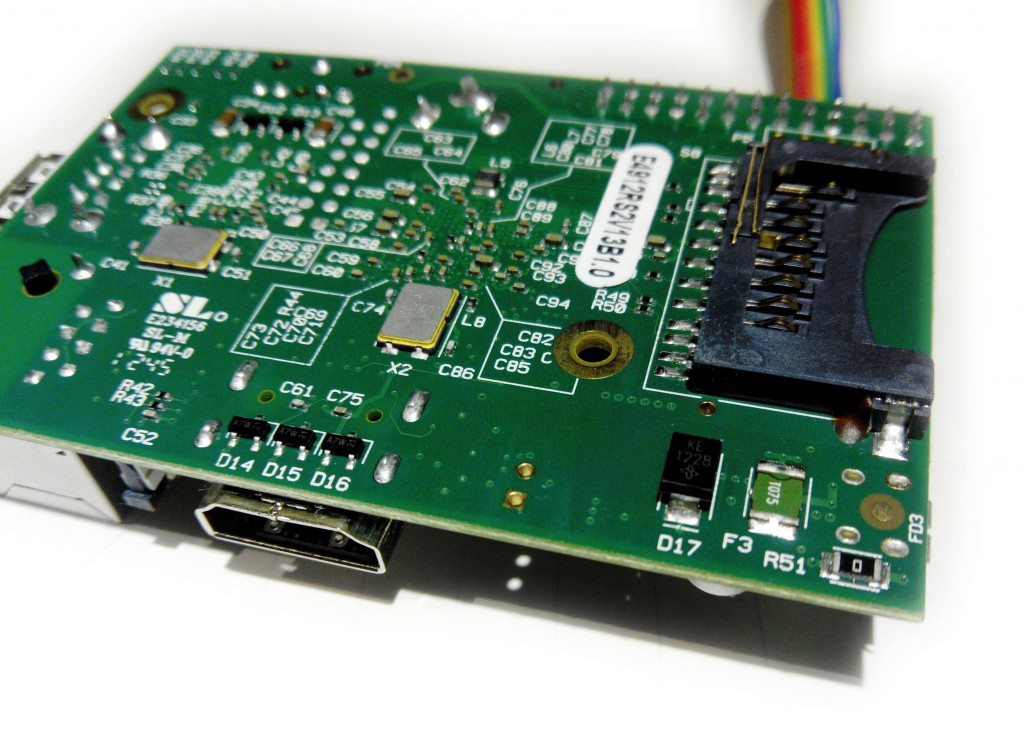
But that is probably not enough to avoid corruption on the SD-Card. Or at least this is what I thought. So the other solution was to find a way to raise the voltage from 4.66V to a reasonable value. The F3 polyfuse that protects the board has a noticeable resistance causing a voltage drop of ~0.2V.

The F3 polyfuse (green) is located at the bottom right of the board, next to the zero ohm resistor.

The F3 polyfuse (green) is located at the back bottom right of the board.

I soldered the polyfuse and the voltage raised to 4.85V. Did not have any corruption problem since more than a month. Fantastic!

However remember that the fuse is there for a reason. It limits the maximum amount of current powering the board. Without the polyfuse the RPi can ask more current than the PSU is rated for (which can happen for example if you short the GPIOs). So it might be a better idea to try another power supply or USB cable. I just like to live dangerously. I also protected those RPi with a case. Note that the RPi B+ and newer have a new power supply circuitry with a lower voltage drop. So all of this may not be needed.

Constant SD-Card corruption on the RPi

Our home servers broke. Here we are again.

I spent weeks of my time, countless evenings up to 4AM, entire weekends since months trying to design and configure our reborn home-servers and gateways.

And it was neat.

  • DNSSEC all the way down
  • RPC accross the nodes
  • Easy configuration
  • Caching and stuff
  • Automatic tests

It took me a lot of time to assemble all of this in something that I liked. And to document everything so that we could easily install a new node from scratch.

I installed two nodes and it worked well for several weeks. Until a week ago or so I started to see corruption on the first node. And by corruption I mean random garbage in a lot of binaries and libraries. Exec format error at every corner. At this point it was completely broken and useless so the only option was to reinstall it.

So I used a new SD-Card, changed the power supply and reinstalled everything last weekend. Just finished today and also fixed bugs in some of our scripts. Had to search for a package on the second node which at this point was still in a pretty good shape.

$ apt-cache
zsh: exec format error: apt-cache
$ su
zsh: exec format error: su

Dang! So there goes another weekend I will spend to reinstall the thing. And who knows how long until the first node gets corrupted again.

Checked the TP1-TP2 voltage, 4.65V, probably because of the second USB Ethernet adapter. I tried to limit the amount of writes on the SD-Card. No heavy writers, no swapping, no overclocking.

So I must be doing something wrong, right? Right?! The RaspberryPi can be that unreliable. I wonder how many power supplies and SD-Cards I will have to buy and try until, by sheer luck, I do not have to reinstall everything in the following three months or so.

I ran into this problem years ago. And now it seems that I will run in the same problem over and over again. Any recommendation is welcome of course. Though to be honest, for now, I just want to fly the damn thing across the room.